Help Centre
Support > Designing and Building Your Website > Adding Your Content
How To Add Custom HTML To Your Website
If you have some HTML that you would like to add to your website, you can do so by adding a Custom HTML Integration and then insert the Integration where you would like it to appear in the content (or behind the scenes) of your website.
You can set the Custom HTML to be applied to multiple pages or your shop pages, or set it manually so you can place it specifically where you need it.
Jump to a section:
- Accessing the Custom HTML Integration
- Adding Custom HTML
- Types of Custom HTML
- Adding Custom HTML to a Page Using Custom Blocks
Accessing The Custom HTML Integration
To access Custom HTML in your account, follow the steps below.
*Please note Custom HTML is supported on our Profesional and above packages.
1. Log in to your Create account
2. Select Content on the Top Menu
3. Click Integrations from the left-hand menu - you will see the following area

4. Click the Add Integration button, located in the top-right of this area.
5. A grid of different Integrations will be displayed, click the Custom HTML option.

Adding Custom HTML
After clicking on Custom HTML, you will see the following panel displayed in your Create application.

1. In the Description box enter something descriptive so that you know what the HTML code is for or what it does. This is just for your reference and will not be visible on your live website
2. Paste your HTML code into the large HTML Code box
3. Choose between the Manual, All Pages and Product Pages types. Here you are setting where the code will be applied. Depending on which option you select, you will have additional output locations you can set. If you need to place the code on a specific page or part of a page, then use the Manual setting. If you are unsure which option, you can contact your Account Manager for further advice.
4. Finally, click the Add Integration button
You will be returned to the Integrations screen where your new fragment will now be listed, similar to the example below.

If you wish to completely remove any Custom HTML from your site then click the delete button that appears next to it. You will be asked to confirm that your action.
Types of Custom HTML
When creating an HTML Fragment, you have three type choices.
Manual - This option will not automatically place the HTML anywhere on your website, but rather allow you to place it yourself. An example of this could be a newsletter sign up form, which you want to embed into a specific section of your website. See below for instructions on how to manually add Custom HTML to a page.
All Pages Head/Body - This option will place the HTML on every page header or body, depending on which option is selected. This is useful if you are applying a site tracking code which requires it to be active on every page. Usually the source of where you are copying the code from will state if it needs to be in the Head or Body.
Product Pages Head/Body/Description - This option is useful if you have some Custom HTML you only want to be applied to the Shop area of your website. You can specify where on the Product page you want the code to be applied, including before or after the product description.
Adding Custom HTML to a Page Using Custom Blocks
Once you have created a Custom HTML Integration with the Manual type selected you can insert it into
1. Log into your Create account
2. Click Content on the top menu
3. Click Edit This Page (the pencil icon) next to the page you would like to edit. Click the +Add Block button
4. From the Add Block filters, select the Custom filter in the Blocks that include... category
5. A range of different custom blocks will be displayed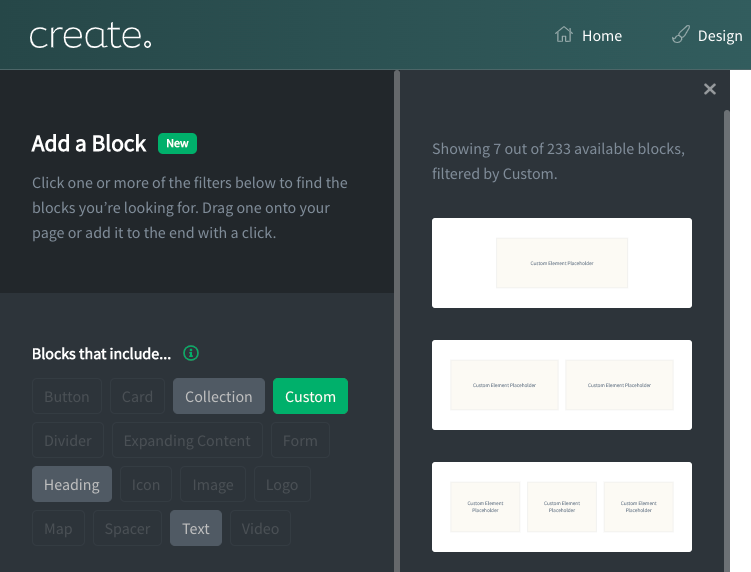
6. Drag and drop the Custom Element content block onto the desired place on the page.
7. Once the Custom Element block has been added to the page, you can click the Add Element button and a range of content types will be listed. Select Integration from the list
8. A list of any Integrations you have added along with Custom HTML will be displayed in the list. Select which Custom HTML fragment you would like to use, it will have the name you supplied in the Description when making it.

9. After selecting the Integration click Done and it will be added to the page as a placeholder.
You can now preview and/or publish your site to see your Custom HTML working on your site.
Related Articles


More Questions?
If you have any further questions, please get in touch and we will be happy to help.
Get in Touch