Help Centre
Support > Domain Names & Email > Domain Names
Managing Your Domains
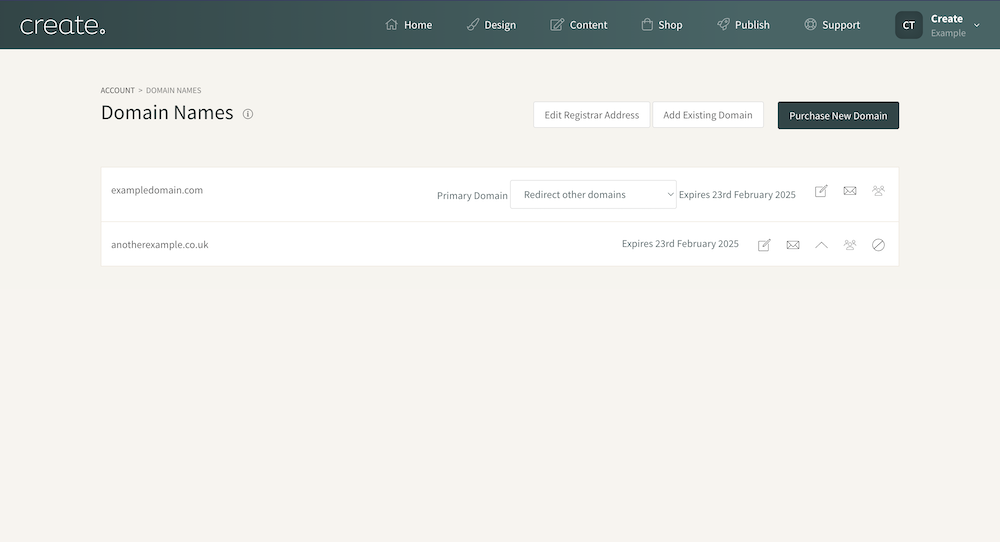
The Manage Domains & Email area allows you to control all of your domains and their settings in one place. As well as registering and adding new domain names, you can also edit your domain’s email settings and TXT records.

Adding a new domain name
To register a brand new domain name, you’ll need to click the Purchase New Domain button in the top right-hand corner. You’ll then be able to use the search option to search for your chosen domain and if available, you’ll be able to add it to your basket and register the domain for a period of two years. Your newly purchased domain will be added to the Manage Domains & Email area and will be automatically set up and ready to use with your website.
If you already own a domain name that you’d like to use with your Create website, you can instead click the Add Existing Domain button and enter your domain. The system will generate two DNS records, an A-record and a CNAME record, that will need to be added in the account where your domain name is hosted.
Once you’ve added these records, you should be able to click the Check Domain Settings button and our system will check that the DNS records have been added correctly. If so, the yellow warning box will disappear and your domain will be ready to use.
Setting your primary domain name
You can have as many domain names added to your Create account as you like but one domain will need to be set as your primary domain. All other domain names will then redirect to that primary domain.
Clicking the up-arrow icon on a secondary domain will make that domain your primary domain.
Editing a domain’s TXT records
For all domain names registered through Create, you’ll have the ability to edit their TXT records in your account. If you click the TXT Records icon to the right of the domain you’d like to edit, followed by the Add TXT Record button, a side panel will open allowing you to add the Name and Content of the TXT record you’d like to add. Clicking the Create DNS Record button will then add the TXT record to your domain.
Any TXT records on a domain will be listed in the TXT Records area that you can edit or delete.
If any other DNS records need to be added to your domains, get in touch with your Account Manager and we’ll be able to add these for you.
Editing email settings
If you registered your domain with us, you’ll be able to add up to 5 email aliases per domain name. This means you can set up an email address such as info@yourdomain.com which will then forward to an existing email address.
It’s important to note that you’ll only be able to receive emails to these addresses. To be able to send and receive emails to an email alias, you’ll need to set this up with a third-party provider.
To adjust your domain’s email settings, you can click the Email Settings icon. Here you can create your email alias in the left-hand column and then enter the email address you’d like the alias to forward to in the right-hand column.
Renewing Domains Registered With Create
Any domain names purchased with Create are registered for a two-year period. We will start sending you email notifications 90 days before your expiry date letting you know when your renewal is coming up, and reminding you to renew your domain name. But we also recommend you make a note/reminder of your renewal date as well.
When a domain is due to be renewed, there will be a warning shown below the domain, along with how many days are left until it expires. To renew the domain, click the Renew link shown below the domain and follow the on-screen process to complete the renewal and make payment.
Disabling Unused/Expired Domains
As your website evolves, you may no longer need a certain domain. While it may be worth having any domain you own directing at your website, if you did wish to stop a certain domain directing to your site or you have let it expire, you can disable it in your account. To do this, a Disable This Domain icon displays next to any active domains. Click the icon and this will turn the domain off.
Please Note: You cannot disable a Primary domain name for your website. If you wish to do this, then you will need to make an alternative domain the Primary first and then follow the instructions given above.
Transferring your domain to another Create account
If you’d like to transfer your domain name to a different Create account, you can click the Transfer To Another Account icon and you’ll be prompted to enter the email address for the Create account you’d like to transfer the domain name to. Once entered, a transfer code will be generated that you’ll need to save.
If you log into the Create account that you transferred the domain name to and access the Manage Domains & Email area, you’ll see a textbox where you can paste the transfer code. Then simply click the Transfer button to complete the process.
Related Articles
Related Articles
More Questions?
If you have any further questions, please get in touch and we will be happy to help.
Get in Touch


