Help Centre
Support > Promoting Your Website > Social Media
How to use the Twitter 'Tweet Button' Widget
The Tweet Button will create a default message for your visitor to Tweet which will include your Title Tag for the page it is being displayed on and the usernames and hashtag you have specified in the setup of the widget.
In this guide we will look at the following:
- How to create the Tweet Button
- How to display the Tweet Button in a "Side Column Item"
- How to display the Tweet Button on your "Site Footer"
- How to display the Tweet Button on a page of your website
- How to publish the changes to your live website
How to create the Tweet Button
To create the Tweet Button please follow the instructions below:
- Log in to your Create account
- Click on "Content" on the top menu.
- Click on "Widgets" on the left hand menu.
- Click on "Add New Widget".
- Scroll down to the "Tweet Button" widget and click "Add Widget".
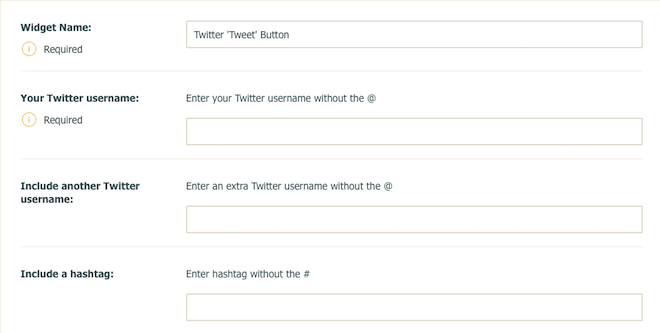
- Set up the "Tweet Button" by giving the widget a name for your reference
- Enter the Twitter username you want to be included as default in the Tweet created by the button. This would usually be your Twitter username. If this is included the Tweet will tag you and appear in your Twitter mentions when you look on the Twitter platform. Add an additional Twitter username if you want to and a hashtag if you use one. These options are at your discretion if you need them and are not required for setup.
- Click "Save Changes".
Once you have created the Widget you can follow the instructions below to insert it into the area of your website where you want it to appear.
Please note that when a tweet is generated by clicking the 'Tweet' button, the page description that appears comes from that page's 'Title Tag'. You may want to consider shortening the Title Tag to ensure that the generated tweet isn't too long.
How to display the Tweet Button on your "Site Footer"
To display the Tweet Button on your "Site Footer" please follow these steps:
- Click on "Content" on the Top Menu.
- Click on "Edit Site Footer" on the left hand menu.
- When the content editor appears, place your cursor where you would like the Tweet Button to appear and click the "Insert Widget" icon on the Editor Toolbar (this icon looks like a lightning bolt).
- Select the Widget from the drop-down list and click the "Insert Button". A grey holding box will then appear as shown in the screenshot below.
- Click the "Save Changes" button.
How to display the Tweet Button on a page of your website
To display the Tweet Button on a page of your website please take a look at the instructions below:
-
Click Content on the top menu
-
Click Edit This Page (the pencil icon) next to the page you would like to edit
-
Click the +Add Block button
-
From the Add Block filters, select the Custom filter in the 'Blocks that include...' category
-
You can then drag and drop the Custom content block you need, onto the desired place on the page.
Once the Custom Element block has been added to the page, you can click the + icon and use the drop-down menu to select what content you would like to add to the page.
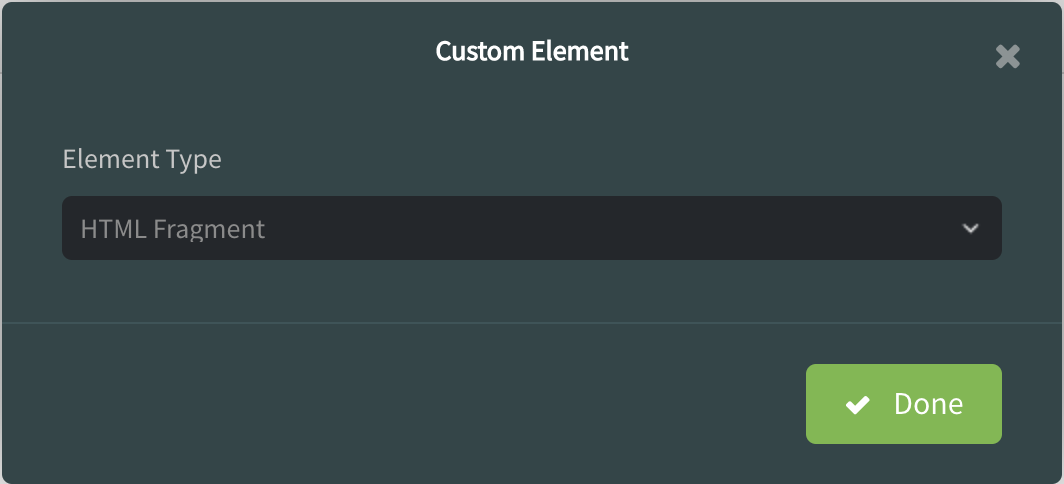
You’ll see you can select content including Widgets, HTML Fragments and Custom Forms, as well as combinations of other blocks such as Buttons, Headers, Images, Videos, Maps and Text.
A placeholder icon will be added to the page and if you click the Settings icon, you can specify exactly which widget or HTML fragment for example, you would like to use. Click Done and then save your changes.
Your Tweet Button will then appear as below:

Once you have added the Tweet Button to the places you want it to display on your website you will need to publish the changes to your live website.
How to publish the changes to your live website
To publish the changes to your live website please do the following:
- Click on "Publish" on the Top Menu.
- Click on "Publish to Web".
- Click on the "Yes, Publish!" button
- Your changes will now appear live.
Related Articles
More Questions?
If you have any further questions, please get in touch and we will be happy to help.
Get in Touch


