Help Centre
Support > Ecommerce > Accepting Payments Through Your Shop
How to set up Clearpay

Clearpay is a payment service that allows customers to pay for their order in 4 automatic instalments. As the merchant, you will be paid in full, whilst Clearpay will lend the customer a fixed amount of credit for the transaction and then arrange the repayments with them directly. Payments are collected every 2 weeks with no added interest, however customers are liable to fees if the payments are missed.
You can add Clearpay in a few quick steps, however you’ll first need to make sure that you’ve added Stripe as a payment gateway.
You can read our Stripe setup guide here.
How to enable Clearpay
Once you have Stripe successfully set up and functioning as part of your checkout, you’ll need to log into your Stripe account and follow the below steps:
- Click the Settings icon in the top right-hand corner
- Click the Payments option
- Click the Payment Methods tab.
This area is where you can control what payment methods you accept as part of your Stripe gateway.
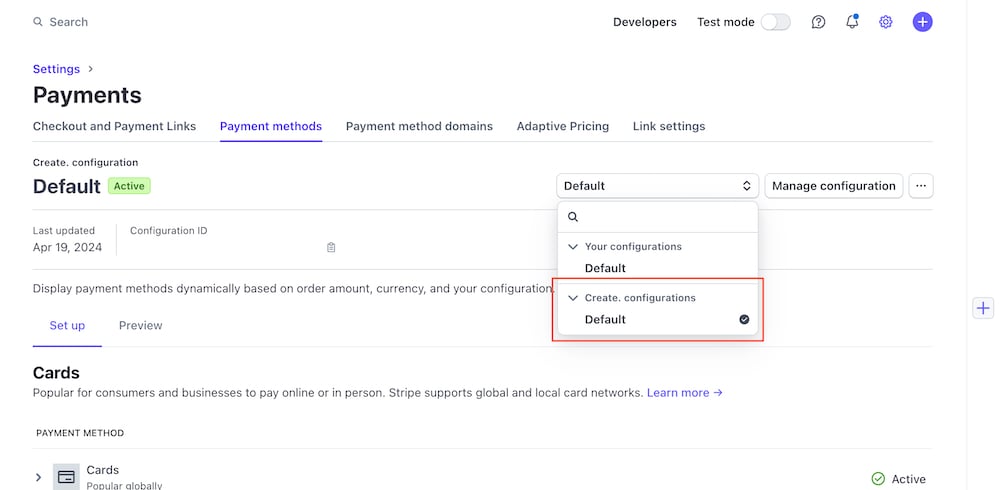
It’s very likely that when setting up Stripe with your Create account, Stripe will have added a separate Create configuration for you. You’ll need to make sure you’re editing this specific configuration.
If you click the drop-down option shown in the image below, you’ll need to ensure that you have your Create configuration selected.

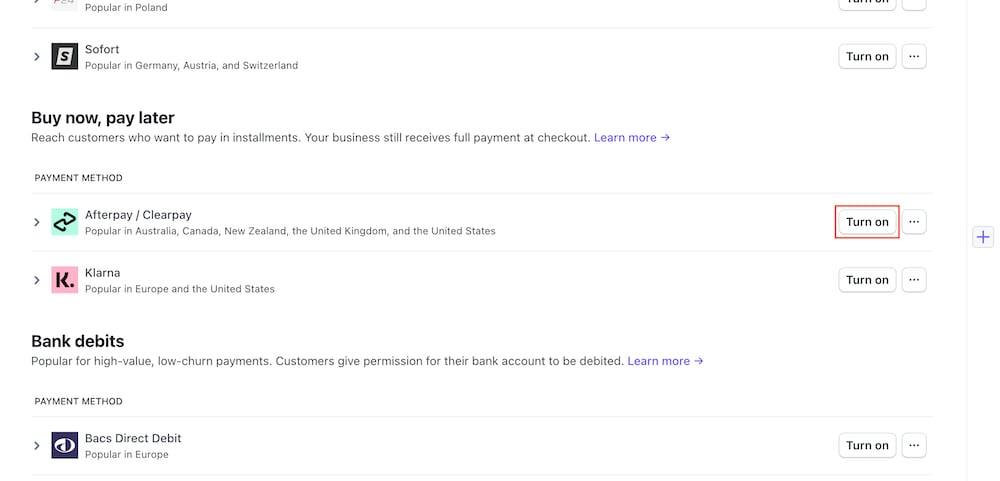
Once selected, if you scroll down to the Buy now, pay later section, you should see Afterpay / Clearpay listed there. You’ll just need to click the Turn on button to enable it.

You’ll notice if you click the Create custom rules icon to the right of the button, you can also adjust the minimum and maximum transaction amounts you’d like to accept via Clearpay.
If you scroll back to the top of the Payment Methods page, you can click the Preview tab to preview how your Stripe checkout will look for customers.
Promoting Clearpay on your website
As we don’t offer Clearpay as its own unique payment gateway, you may want to direct potential customers to Stripe in order to use it. We’ve added a Clearpay card logo that can be displayed in your footer and also next to Stripe at checkout. You can enable it by following the steps below:
- In your Create account, click Shop on the top menu
- Click Settings in the left-hand menu, followed by Payment Gateways
- Click the Edit This Gateway icon next to Stripe
- Click the Accepted Cards tab
- Click the checkbox next to the Clearpay logo
- Click the Save Changes button
- Republish your website.
As well as that, Clearpay offer a wealth of marketing resources that you can add to your website, such as logos and banners, all of which can be found here.
Related Articles
More Questions?
If you have any further questions, please get in touch and we will be happy to help.
Get in Touch


