Blog > The 'Do's & 'Don't's of Website Photography
Posted By Create

Quality photography can make all the difference to your website and online shop, from your home page, where your site visitors first form their impression of your website, to your product and category images, where your customers will make the crucial decision whether to purchase your goods or not.
Below we look at some examples of photography on websites and offer some general tips on how to take great pictures and the sort of tools that will help.
Home Page Photographs
We humans are notoriously fickle when it comes to first impressions, and purchase decisions are obviously no different. Visitors to your site will make a large part of their buying decision in the first few seconds of viewing your website, so it's crucial that any photography on your website's home page is of the highest quality.

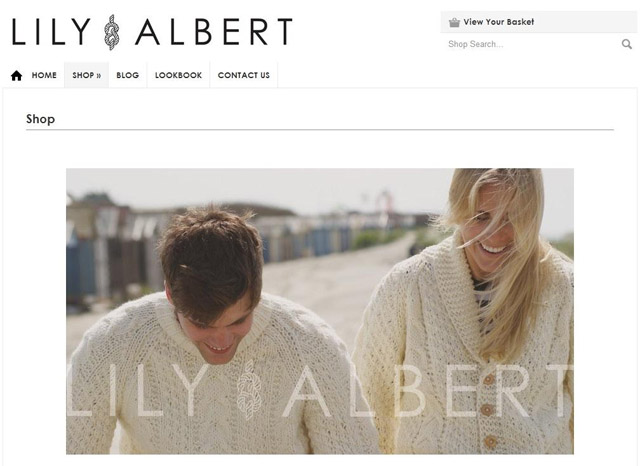
As you can see from the above screenshot, the shop home page of knitwear fashion seller Lily & Albert looks immediately credible. This is because the main body of the shop home page consists of a very high quality photograph. The minimal nature of the page allows for a striking and enticing representation of their products.
We can see from the photograph that:
- The resolution/DPI is high.
- It has been taken using a good quality camera.
- There is a consistent colour scheme within the cream to grey spectrum.
- The subjects are in focus, and the background is out of focus, making the product and subject of the picture stand out.
- The products are displayed in a relevant context: warm jumpers by the windy sea.
Here's Kathryn McCormick, owner of Lily & Albert, with her take on what makes good photography:
“We've had a lot of variety in terms of photography. It ranges between myself and my dad's good camera, students from The London School of Photography, part-time photographers looking to build up their portfolio and professionals. It's a great idea to work with enthusiastic, well equipped photographers learning their trade.
"My advice to smaller businesses would be not to rule out keen amateurs or student photographers. It's great to feel like you're working with someone who's just as enthusiastic to learn and explore new ideas as you are at the start of any new campaign."
Good equipment will generally produce better photography and a better depiction of your product and brand. It's best to source a good camera from wherever you can. It's also astute to involve people who know how to use the equipment. Also, educating yourself through trial and error or via learning materials can work absolute wonders.
Product Photography
Pictures are the best way to present your products so it should go without saying that the better you make them look, the more enticed the customer will be into buying them.
The above screenshot from Honeypie Boutique's shop categories page displays a pink and white themed page, perfectly complimented and enhanced by very good product photography. The backdrops of the images are all pink, holding true to the consistency of the website's overall colour scheme. The products are clearly, accurately and cleanly presented for the enjoyment and clarity of the potential customer.
We can see from these photographs that:
- The backdrop looks professional. It's a light, plain colour matching the site's design and allowing the products to stand out.
- The products are well lit.
- The products are presented in their best possible form, hanging from a quality mannequin stand, on their own, or zoomed in on to reveal key features.
Here's Honeypie Boutique's Amy Russell with her top tips for good product photography:
- Invest in a decent camera to capture nice, sharp shots.
- Take the photos in good natural light.
- Keep the photos simple and uniform.
- Use image editing software to sharpen them up and crop them to show the product at the optimum size.
Again, it's all about your products being presented in a nice and simple way, in good light with a decent camera. Image editing software is fantastic as it can go some way to bypass the limitations of low quality cameras and take your images to the next level. Check out our tips list at the end of this post for more advice on image editing software.
Avoiding Poor Photography
Having seen great examples of professional-looking, high quality photography, let's now compare these to an example of bad photography that we've set up just for this blog.
What's wrong with it?
The photograph is set against a minimal backdrop, however this alone doesn't ensure a great first impression. This made-up 'Arts &Crafts' website looks unprofessional because of the poor quality of the image.
- The image is taken using a standard digital camera rather than an 'SLR' (Single-lens reflex) camera. This means the picture is not of especially high resolution/DPI.
- The background is dark, badly lit, and includes intruding, unrelated objects in the shot.
- There is more than one product on show. This makes all products appear unimportant and the visitor is not drawn to anything in particular.
- The products are not in any relevant context. They are not in use, nor are they clearly displayed.
Tip List: How To Get Your Photography Right
- Take good quality images with a sharply-focused object and an out-of-focus background.
- When choosing the background and image style for your photographs, consider the overall style and colour palette of your website. Photographs and site design need to compliment each other
- When organising a photo shoot, think ahead. Shoot some shots for your future advertising and promotions. You need a stock of images you can use to promote your business for a few months or even the first year before you need to update your photographs.
- If you recruit a photographer, a face-to-face meeting is always the best way to discuss all possibilities before going ahead.
- Never clutter your photos. Simplicity and clarity is the key! If you're photographing a product, make sure it's in its best possible form.
- Throughout your website, include images of your products ‘in use’, using lifestyle shots rather than simply product shots. Use them on your website’s blog and banners to promote particular products. Choose the setup, location and positioning of any models carefully.
- Your website is your ’shop window‘, so make sure you keep it up to date and renew it every few weeks to keep your customers interested.
- Consider purchasing image editing software such as Adobe Photoshop or downloading reliable freeware like GIMP (GNU Image Manipulation Program). When you get your hands on image editing software you can manipulate photographs to your heart's content. You can make your product lighter, remove imperfections and a whole lot more!
- One way to achieve great lighting is to use natural light on your product. Avoid direct harsh light. If possible, position your product so that it's between the light source and your camera as backlighting will make the product stand out better.
- Another way to ensure good lighting is to look into purchasing a studio light box kit, as this can have great results. Point your lightening into your light box. Look to using image editing software to edit the brightness and contrast of the image to get it on point. See me and Andy below using a studio light box kit, as well as the slightly modified product image we created.
I hope these examples and tips help you to make the very best presentation of your products and company possible. Share your photography tips or ask a question in our comments section below.


